
| 일 | 월 | 화 | 수 | 목 | 금 | 토 |
|---|---|---|---|---|---|---|
| 1 | ||||||
| 2 | 3 | 4 | 5 | 6 | 7 | 8 |
| 9 | 10 | 11 | 12 | 13 | 14 | 15 |
| 16 | 17 | 18 | 19 | 20 | 21 | 22 |
| 23 | 24 | 25 | 26 | 27 | 28 | 29 |
| 30 |
- MIPS
- 컴퓨터구조
- 리눅스
- 정보처리기사
- Coding
- 명령어
- 네트워크 충돌
- 기구학
- 정렬
- 자격증
- 알고리즘
- homogenous
- homogeinous
- 합병
- robotics
- Java
- Linux
- 3dof
- 회전 복잡도
- ROS2
- CentOS
- humble
- Computer
- sam2
- 정처기
- sort
- segmentation
- AI
- SQL
- 맥케이브
- Today
- Total
UTF-404
💡 SAM2 직접 적용해보기 본문
이전 글에서 SAM2가 무엇인지에 알아보았다.
오늘은 실제로 다운로드하여서 각각 각자가 원하는 이미지 파일 또는 영상 파일을 직접 세그멘테이션을 해보는 시간을 가져볼까 한다.
필자는 이 글에서 이미지만 다룰 예정이다.
아래의 링크에서 SAM2 Demo를 설치할 수 있다.
https://github.com/facebookresearch/sam2
GitHub - facebookresearch/sam2: The repository provides code for running inference with the Meta Segment Anything Model 2 (SAM 2
The repository provides code for running inference with the Meta Segment Anything Model 2 (SAM 2), links for downloading the trained model checkpoints, and example notebooks that show how to use th...
github.com
설치하는 방법이 어렵다면 구글링으로도 어렵지 않게 찾아볼 수 있을 것이다. (곧 필자의 github에 작업 환경을 업로드 후 추가적으로 글을 올리거나 이 글을 수정해서 올릴 수 있도록 하겠다.)
그럼 간단하게 Meta에서 제공한 코드와 필자가 조금 변형시킨 코드에 대해 각각 소개해보겠다.
Meta SAM2 코드 알아보기
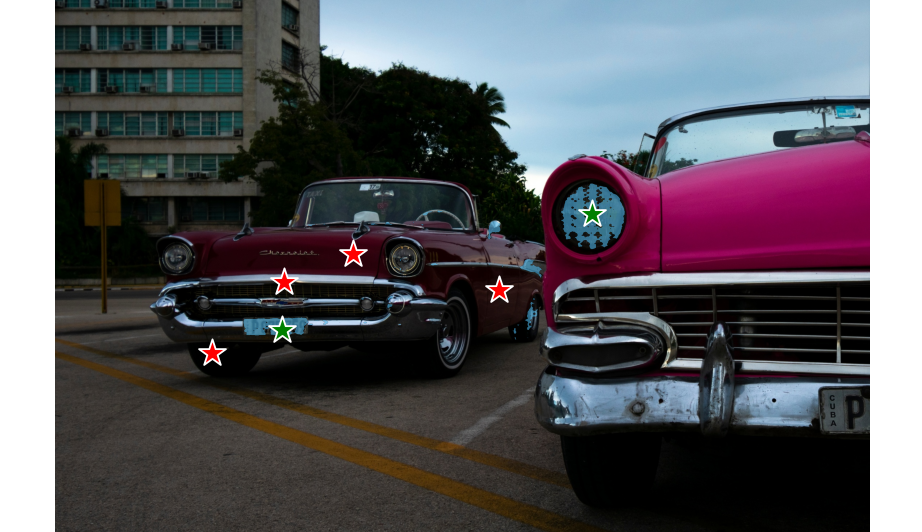
메타에서 제공한 코드를 살펴보면 초록색 별과 빨간색 별로 객체를 인식할 것인지 구분한다.
초록색 별은 세그멘테이션을 할 부분을 나타내며, 빨간색 별은 세그멘테이션을 하지 않을 부분을 의미한다.
사실 초록색 별만으로도 원하는 객체를 구분할 수 있지만, 조금 섬세한 작업이 필요할 경우를 대비해 빨간색 별을 활용한다.
Meta에서 제공하는 이미지 파일을 보면 차를 예시로 드는데, 이때 창문 또는 차의 바퀴를 세그멘테이션 할 때 부분적으로 창문 개별을 인식하거나 바퀴의 타이어 부분만 인식하고 싶다는 예시를 든다. 이때 초록별로 우선 세그멘테이션을 진행하고, 그 이후에 빨간색 별을 이용하여 부분적으로 필요 없는 부분을 걷어내는 방식이다. 그럼 Meta code를 필자의 방식대로 코드화한 것을 보고 직접 해보자.
import torch
import numpy as np
import matplotlib.pyplot as plt
from PIL import Image
from sam2.build_sam import build_sam2
from sam2.sam2_image_predictor import SAM2ImagePredictor
from sam2.sam2_automatic_mask_generator import SAM2AutomaticMaskGenerator

# 디바이스 설정
if torch.cuda.is_available():
    device = torch.device("cuda")
elif torch.backends.mps.is_available():
    device = torch.device("mps")
else:
    device = torch.device("cpu")
print(f"using device: {device}")

if device.type == "cuda":
    torch.autocast("cuda", dtype=torch.bfloat16).__enter__()
    if torch.cuda.get_device_properties(0).major >= 8:
        torch.backends.cuda.matmul.allow_tf32 = True
        torch.backends.cudnn.allow_tf32 = True
elif device.type == "mps":
    print("\nSupport for MPS devices is preliminary.")

np.random.seed(3)

# 시각화 함수
def show_mask(mask, ax, random_color=True, borders=True):
    if random_color:
        color = np.concatenate([np.random.random(3), np.array([0.6])], axis=0)
    else:
        color = np.array([30/255, 144/255, 255/255, 0.6])
    h, w = mask.shape[-2:]
    mask = mask.astype(np.uint8)
    mask_image = mask.reshape(h, w, 1) * color.reshape(1, 1, -1)
    if borders:
        import cv2
        contours, _ = cv2.findContours(mask, cv2.RETR_EXTERNAL, cv2.CHAIN_APPROX_NONE)
        contours = [cv2.approxPolyDP(contour, epsilon=0.01, closed=True) for contour in contours]
        mask_image = cv2.drawContours(mask_image, contours, -1, (1, 1, 1, 0.5), thickness=2)
    ax.imshow(mask_image)

def show_points(coords, labels, ax, marker_size=375):
    pos_points = coords[labels == 1]
    neg_points = coords[labels == 0]
    ax.scatter(pos_points[:, 0], pos_points[:, 1], color='green', marker='*', s=marker_size, edgecolor='white', linewidth=1.25)
    ax.scatter(neg_points[:, 0], neg_points[:, 1], color='red', marker='*', s=marker_size, edgecolor='white', linewidth=1.25)

def show_box(box, ax):
    x0, y0 = box[0], box[1]
    w, h = box[2] - box[0], box[3] - box[1]
    ax.add_patch(plt.Rectangle((x0, y0), w, h, edgecolor='green', facecolor=(0, 0, 0, 0), lw=2))

def show_masks(image, masks, scores, point_coords=None, box_coords=None, input_labels=None, borders=True):
    for i, (mask, score) in enumerate(zip(masks, scores)):
        plt.figure(figsize=(10, 10))
        plt.imshow(image)
        show_mask(mask, plt.gca(), borders=borders)
        if point_coords is not None:
            assert input_labels is not None
            show_points(point_coords, input_labels, plt.gca())
        if box_coords is not None:
            show_box(box_coords, plt.gca())
        if len(scores) > 1:
            plt.title(f"Mask {i+1}, Score: {score:.3f}", fontsize=18)
        plt.axis('off')
        plt.show()

# 이미지 및 모델 로드
image = Image.open('images/car.jpg')
image = np.array(image.convert("RGB"))

sam2_checkpoint = "checkpoints/sam2.1_hiera_large.pt"
model_cfg = "configs/sam2.1/sam2.1_hiera_l.yaml"

sam2_model = build_sam2(model_cfg, sam2_checkpoint, device=device)
predictor = SAM2ImagePredictor(sam2_model)
predictor.set_image(image)

# 포인트 기반 예측
input_point = np.array([
    [239, 637], [258, 802]                                               # 취소하는 부분들
])

input_label = np.array([1, 0])


# 첫 번째 예측 수행 (logits 포함)
masks, scores, logits = predictor.predict(
    point_coords=input_point,
    point_labels=input_label,
    multimask_output=False,
)

# 가장 높은 점수의 마스크 선택
mask_input = logits[np.argmax(scores), :, :]

# 시각화
# plt.figure(figsize=(10, 10))
# plt.imshow(image)
# for mask in masks:
#     show_mask(mask, plt.gca(), random_color=True)
# show_points(input_point, input_label, plt.gca())
# plt.axis('off')
# plt.show()

print(predictor._features["image_embed"].shape, predictor._features["image_embed"][-1].shape)

# 두 번째 예측 (이전 마스크를 mask_input으로 활용)
masks, scores, logits = predictor.predict(
    point_coords=input_point,
    point_labels=input_label,
    mask_input=mask_input[None, :, :],
    multimask_output=False,
)

# 결과 정렬
sorted_ind = np.argsort(scores)[::-1]
masks = masks[sorted_ind]
scores = scores[sorted_ind]
logits = logits[sorted_ind]

# 결과 표시
show_masks(image, masks, scores, point_coords=input_point, input_labels=input_label)
클릭 이벤트를 활용한 GUI mode SAM2 활용해보기
위의 방식은 실제로 내가 원하는 구역의 좌표값(x, y)을 입력해서 세그멘테이션을 진행해야 한다는 불편함이 있다.
그래서 필자는 Meta SAM2 공식 홈페이지에서 demo 버전으로 사용해 볼 수 있는 GUI 모드를 실제로 이미지에 적용해 보면 어떨까 라는 생각을 하게 됐다. 그래서 간단하게 클릭 이벤트를 이용해서 위의 코드를 변환시켜보았다. 사용해 보면 조금 더 편리하다.
import torch
import numpy as np
import matplotlib.pyplot as plt
from PIL import Image
import cv2
from sam2.build_sam import build_sam2
from sam2.sam2_image_predictor import SAM2ImagePredictor

# 디바이스 설정
device = torch.device("cuda" if torch.cuda.is_available() else "cpu")
print(f"Using device: {device}")

if device.type == "cuda":
    torch.autocast("cuda", dtype=torch.bfloat16).__enter__()
    if torch.cuda.get_device_properties(0).major >= 8:
        torch.backends.cuda.matmul.allow_tf32 = True
        torch.backends.cudnn.allow_tf32 = True

np.random.seed(3)

# 무작위 컬러 생성 함수
def generate_random_color():
    return (np.random.randint(0, 255), np.random.randint(0, 255), np.random.randint(0, 255))

# 시각화 함수
def show_mask(mask, ax, color=None, borders=True):
    if color is None:
        color = np.concatenate([np.random.random(3), np.array([0.6])], axis=0)
    h, w = mask.shape[-2:]
    mask = mask.astype(np.uint8)
    mask_image = mask.reshape(h, w, 1) * color.reshape(1, 1, -1)
    ax.imshow(mask_image)

def show_points(coords, labels, ax, marker_size=375):
    pos_points = coords[labels == 1]
    neg_points = coords[labels == 0]
    ax.scatter(pos_points[:, 0], pos_points[:, 1], color='green', marker='*', s=marker_size, edgecolor='white', linewidth=1.25)
    ax.scatter(neg_points[:, 0], neg_points[:, 1], color='red', marker='*', s=marker_size, edgecolor='white', linewidth=1.25)

# 이미지 및 모델 로드
image_path = 'images/car.jpg'
image = Image.open(image_path)
image_np = np.array(image.convert("RGB"))

sam2_checkpoint = "checkpoints/sam2.1_hiera_large.pt"
model_cfg = "configs/sam2.1/sam2.1_hiera_l.yaml"

sam2_model = build_sam2(model_cfg, sam2_checkpoint, device=device)
predictor = SAM2ImagePredictor(sam2_model)
predictor.set_image(image_np)

# 포인트 및 라벨 저장 리스트
input_points = []
input_labels = []
final_mask = None  # 최종 마스크 저장 변수

# 마스크 예측 및 시각화 함수
def update_segmentation():
    global final_mask

    if len(input_points) == 0:
        return

    points = np.array(input_points)
    labels = np.array(input_labels)

    masks, scores, logits = predictor.predict(
        point_coords=points,
        point_labels=labels,
        multimask_output=False
    )

    final_mask = masks[0]  # 가장 높은 점수의 마스크 저장

    # 시각화
    plt.clf()  # 기존 그래프 초기화
    plt.imshow(image_np)
    show_mask(final_mask, plt.gca(), color=np.array([0.3, 0.7, 0.9, 0.6]))  # 고정된 색상으로 표시
    show_points(points, labels, plt.gca())
    plt.axis('off')
    plt.draw()

# 클릭 이벤트 처리 함수
def on_click(event):
    if event.inaxes:  # 이미지 내부에서 클릭한 경우
        x, y = int(event.xdata), int(event.ydata)

        if event.button == 1:  # 왼쪽 클릭 (초록색 포인트)
            input_points.append([x, y])
            input_labels.append(1)
            print(f"Added positive point: ({x}, {y})")

        elif event.button == 3:  # 오른쪽 클릭 (빨간색 포인트)
            input_points.append([x, y])
            input_labels.append(0)
            print(f"Added negative point: ({x}, {y})")

        update_segmentation()  # 클릭 후 즉시 세그멘테이션 업데이트

def save_colored_mask(mask, filename="output/final_colored_mask.png"):
    h, w = mask.shape
    colored_mask = np.zeros((h, w, 3), dtype=np.uint8)

    color = generate_random_color()

    colored_mask[mask == 1] = color

    combined_image = cv2.addWeighted(image_np, 0.6, colored_mask, 0.4, 0)
    cv2.imwrite(filename, cv2.cvtColor(combined_image, cv2.COLOR_RGB2BGR))
    print(f"Saved colored segmentation mask as {filename}")

# 창 종료 시 결과 저장
def on_close(event):
    if final_mask is not None:
        save_colored_mask(final_mask)

# 이미지 표시 및 클릭 이벤트 연결
fig, ax = plt.subplots(figsize=(10, 10))
ax.imshow(image_np)
plt.axis('off')

# 클릭 및 창 종료 이벤트 연결
fig.canvas.mpl_connect('button_press_event', on_click)
fig.canvas.mpl_connect('close_event', on_close)

plt.show()
<결론>
실제로 사용해 보니 실감이 난다. 정말 앞으로 세상이 얼마나 빠르게 변할까? 애플 비전을 에어팟처럼 쓰고 직장 가지 않으며 앞으로 집에서 모든 것이 이뤄지는 그런 세상이 금방 찾아올 것만 같다. 간단하지만 실제로 Meta SAM2 github를 방문해서 하나씩 읽어보고, 코드를 이해해 보는 것도 좋은 방법일 듯하다. 필자의 코드는 이런 방법으로도 코드를 작동시킬 수 있구나 정도로만 참고하면 될듯하다. 말이 길었다.
정말 1월은 정신없이 지나간 듯하다. 2월은 모두가 더 발전하고 행복한 한 달이 되기를 바라본다.
'private study' 카테고리의 다른 글
| SAM2 다양하게 이용해보기!! (6) | 2025.04.11 |
|---|---|
| 💡 SAM2 알아보기 (0) | 2025.02.02 |
| mac 환경에서 tkinter gui 오류 해결방법!! (4) | 2024.05.02 |
| Raspberry Pi 설치해보기 (0) | 2024.05.02 |
| Docker를 활용한 Ubuntu 설치!! (0) | 2024.03.14 |

